04-摄像机基础实现
注意:本来教程中这期视频还包括了动画类的测试,但是我把这部分内容放到上一节了
1 摄像机
游戏中有三个核心概念,被称为3C,分别表示Character, Camera, Control.
2 窗口与世界坐标系
我们首先区分窗口坐标系与世界坐标系。整个游戏都是在世界坐标系下运行的,而只有在渲染时,我们才考虑将他们放置到窗口坐标系下进行绘图等操作。
而摄像机就是这两个坐标系之间的桥梁。
\[
窗口坐标=世界坐标-摄像机坐标
\]
在我们当下的需求中,摄像机可以等效为一个点。虽然我们可以使用POINT来定义坐标,但为了使用浮点数更精确地表示位置,我们先实现一个在游戏框架中喜闻乐见地二维向量类。
3 Vector2类
class Vector2
{
public:
    float x, y;

public:
    Vector2(float x, float y)
        :x(x), y(y) { }
    ~Vector2() = default;

    Vector2 operator+(const Vector2& vec) const
    {
        return Vector2(x + vec.x, y + vec.y);
    }

    Vector2 operator+(const Vector2& vec) const
    {
        return Vector2(x - vec.x, y - vec.y);
    }

    void operator+=(const Vector2& vec)
    {
        x += vec.x, y += vec.y;
    }

    void operator-(const Vector2& vec)
    {
        x -= vec.x, y -= vec.y;
    }

    float operator*(const Vector2& vec) const
    {
        return x * vec.x + y * vec.y;
    }

    Vector2 operator*(float val) const
    {
        return Vector2(x * val, y * val);
    }

    void operator*=(float val)
    {
        x *= val, y *= val;
    }

    float length()
    {
        return sqrt(x * x + y * y);
    }

    Vector2 normalized()
    {
        float len = length();
        if(len==0)
            return Vector2(0, 0);
        return Vector2(x / len, y / len);
    }
};
4 Camera类
class Camera
{
public:
    Camera() = default;
    ~Camera() = default;

    const Vector2& get_position()
    {
        return position;
    }

    void reset()
    {
        position.x = 0;
        position.y = 0;
    }

    void on_update()
    {

    }
private:
    Vector2 position;
};
之后我们在MenuScene中把之前测试回调函数时添加地测试语句删除
定义摄像机为私有变量
Camera camera;
修改on_draw()方法
const Vector2 &pos_camera = camera.get_position();
animation_peashooter_run_right.on_draw((int)(100 - pos_camera.x), (int)(100 - pos_camera.y));
现在,camera的位置始终为(0,0),运行程序的效果和之前相同。
我们修改
Camera类的on_update()方法,让摄像机动起来void on_update(int delta)
{
const Vector2 velocity= {-0.35f, 0};
position += velocity * (float)delta;
}
在MenuScene的on_update方法中调用摄像机的更新方法
运行程序可以看到,豌豆射手在窗口中向右运动,这时摄像机向左运动的结果。
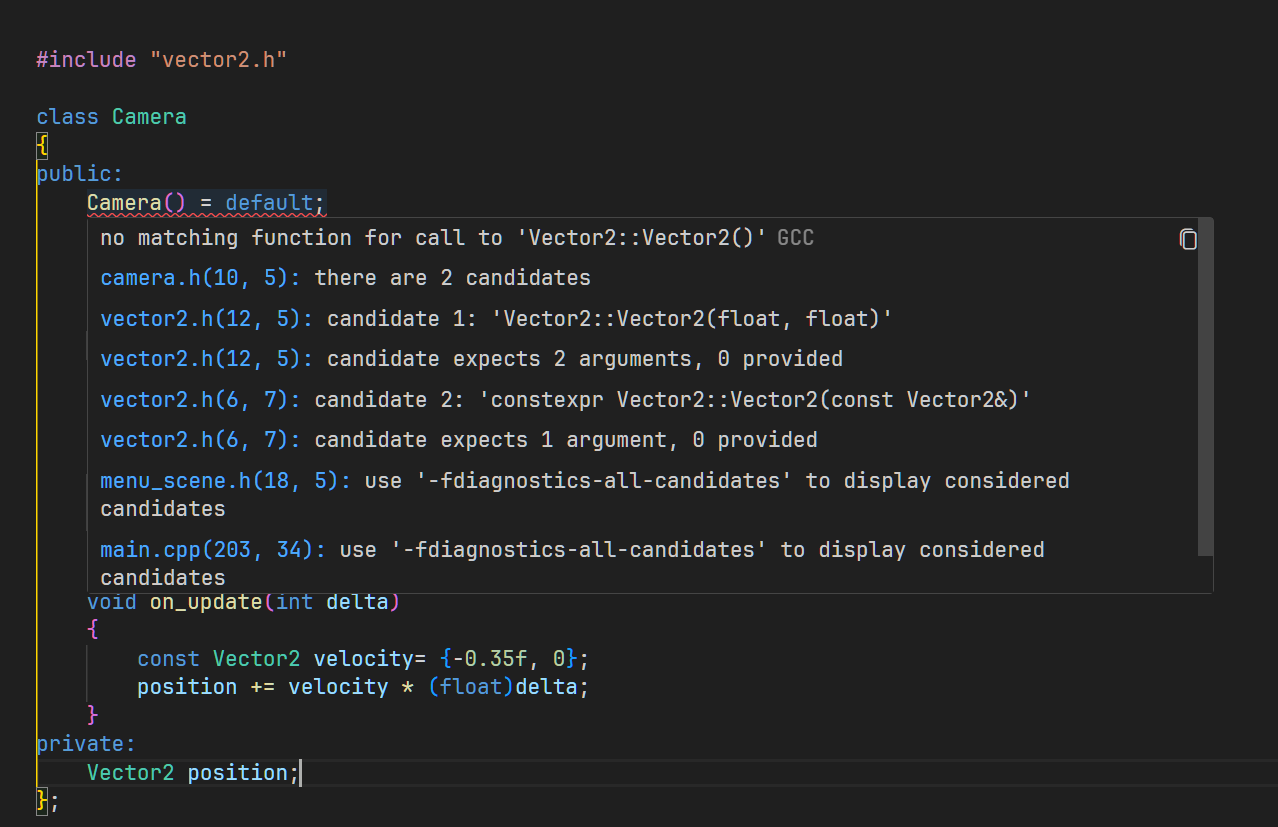
编译程序时出现图中的报错,原因如下
- 使用
Camera() = default;声明默认构造函数时,编译器会尝试自动生成它。 - 这个自动生成的构造函数会尝试默认初始化所有成员变量,包括
position。 - 由于无法找到
Vector2的默认构造函数,编译器在初始化position成员时失败,从而报错。
评论
如果你已登录 GitHub,就可以直接在这里评论。