05-多线程网络通信与联机游戏客户端开发
在前面服务端代码实现中,我们使用的cpp-httplib库在处理请求时使用了多线程的设计。于是我们顺道解释了相关的概念,并讲解了互斥锁等线程同步技术。
如果说服务端部分是因为三方库的使用而被迫使用多线程,那么在客户端中,我们需要主动地创建新的线程,来提高我们的游戏性能。
1 全局变量与函数
为了将联机功能扁平清晰地展现在大家面前,在本项目最后的这部分代码设计中,我们暂时抛开了复杂的程序结构设计,使用全局变量等最简洁地写法来实现游戏功能。
来到先前创建好的client.cpp中,将先前测试使用地代码全部清空后。引入所需的头文件。
由于EasyX中包含的WIndows头文件与HTTP库所依赖的文件,可能存在冲突,所以在编写头文件依赖时注意先后顺序。
#include "../thirdparty/httplib.h"
#include "vector2.h"

#include "path.h"
#include "player.h"

#include <chrono>
#include <string>
#include <vector>
#include <thread>
#include <codecvt>
#include <fstream>
#include <sstream>
然后我们便可以编写这样的枚举类定义
enum class Stage
{
    Waitting, // 等待玩家加入
    Ready,    // 准备起跑倒计时
    Racing    // 正在比赛中
};
1.1 全局变量定义
下面便可以添加这样几个全局变量定义。
注意两个progress变量没有直接使用int类型,而是使用了std::atomic模板类。
之前我们提到可以使用mutex互斥锁来锁定临界区。来避免多线程过程中出现数据竞争问题。而atomic也是相似的作用,如果我们仅需要避免单个变量被多个线程访问出现竞争,而不是一部分代码区域。那么便可以使用atomic,将变量的读写变为在多线程看来不可分割的原子操作。
int val_countdown = 4;
Stage stage = Stage::Waitting;

int id_player = 0;
std::atomic<int> progress_1 = -1;
std::atomic<int> progress_2 = -1;
int num_total_char = 0;
下一步便是构造我们的角色移动路径对象了。
Path类的实现我们在前面已经完成了。使用一个列表初始化的vector对象进行构造。顶点坐标的位置与我们的游戏地图是一一对应的关系。
Path path = Path(
    {
        {842, 842}, {1322, 842}, {1322, 442},
        {2762, 442}, {2762, 842}, {3162, 842},
        {3162, 1722}, {2122, 1722}, {2122, 1562},
        {842, 1562}, {842, 842}
    }
);      // 角色移动路径对象
再接下来便是和打字文本内容相关的几个变量定义了。
客户端从服务器下载获取文本内容后,需要按照换行符将文本拆分成多行存储到vector数组中。在游戏进行的过程中,我们也是需要记录当前已经输入的文本行数索引。以及当前行已经完成的字符数索引。
int idx_line = 0;                       // 当前文本行索引
int idx_char = 0;                       // 当前行文本字符索引
std::string str_text;                   // 文本内容
std::vector<std::string> str_line_list; // 行文本列表
对于游戏中要用到的素材资源,我们也编写了这样的变量定义。
// 玩家1 动画图集
Atlas atlas_1P_idle_up;     // 玩家1向上闲置动画图集
Atlas atlas_1P_idle_down;   // 玩家1向下闲置动画图集
Atlas atlas_1P_idle_left;   // 玩家1向左闲置动画图集
Atlas atlas_1P_idle_right;  // 玩家1向右闲置动画图集
Atlas atlas_1P_run_up;      // 玩家1向上奔跑动画图集
Atlas atlas_1P_run_down;    // 玩家1向下奔跑动画图集
Atlas atlas_1P_run_left;    // 玩家1向左奔跑动画图集
Atlas atlas_1P_run_right;   // 玩家1向右奔跑动画图集

// 玩家2 动画图集
Atlas atlas_2P_idle_up;     // 玩家2向上闲置动画图集
Atlas atlas_2P_idle_down;   // 玩家2向下闲置动画图集
Atlas atlas_2P_idle_left;   // 玩家2向左闲置动画图集
Atlas atlas_2P_idle_right;  // 玩家2向右闲置动画图集
Atlas atlas_2P_run_up;      // 玩家2向上奔跑动画图集
Atlas atlas_2P_run_down;    // 玩家2向下奔跑动画图集
Atlas atlas_2P_run_left;    // 玩家2向左奔跑动画图集
Atlas atlas_2P_run_right;   // 玩家2向右奔跑动画图集

IMAGE img_ui_1;        // 界面文本1
IMAGE img_ui_2;        // 界面文本2
IMAGE img_ui_3;        // 界面文本3
IMAGE img_ui_fight;    // 界面文本FIGHT
IMAGE img_ui_textbox;  // 界面文本框
IMAGE img_background;  // 背景图
全局变量定义的最后一部分便是和联机息息相关的两个内容了。
- 首先是服务器地址,为了方便大家配置自己的服务器并修改客户端的连接地址。我们把服务器地址存放到了外部的配置文件中。在运行时动态读取并存储到address变量中。
- HTTP客户端对象,我们则根据读取的地址动态构造。所以在此处先预留空指针。
std::string str_address;                // 服务器地址
httplib::Client *client = nullptr;      // HTTP客户端对象
1.2 资源加载函数
现在,我们便可以开始定义资源记载函数load_resources了。
void load_resources(HWND hwnd)
{
    AddFontResourceEx(_T("resources/IPix.ttf"), FR_PRIVATE, NULL);

    atlas_1P_idle_up.load_from_file(_T("resources/hajimi_idle_back_%d.png"), 4);
    atlas_1P_idle_down.load_from_file(_T("resources/hajimi_idle_front_%d.png"), 4);
    atlas_1P_idle_left.load_from_file(_T("resources/hajimi_idle_left_%d.png"), 4);
    atlas_1P_idle_right.load_from_file(_T("resources/hajimi_idle_right_%d.png"), 4);
    atlas_1P_run_up.load_from_file(_T("resources/hajimi_run_back_%d.png"), 4);
    atlas_1P_run_down.load_from_file(_T("resources/hajimi_run_front_%d.png"), 4);
    atlas_1P_run_left.load_from_file(_T("resources/hajimi_run_left_%d.png"), 4);
    atlas_1P_run_right.load_from_file(_T("resources/hajimi_run_right_%d.png"), 4);
    atlas_2P_idle_up.load_from_file(_T("resources/manbo_idle_back_%d.png"), 4);
    atlas_2P_idle_down.load_from_file(_T("resources/manbo_idle_front_%d.png"), 4);
    atlas_2P_idle_left.load_from_file(_T("resources/manbo_idle_left_%d.png"), 4);
    atlas_2P_idle_right.load_from_file(_T("resources/manbo_idle_right_%d.png"), 4);
    atlas_2P_run_up.load_from_file(_T("resources/manbo_run_back_%d.png"), 4);
    atlas_2P_run_down.load_from_file(_T("resources/manbo_run_front_%d.png"), 4);
    atlas_2P_run_left.load_from_file(_T("resources/manbo_run_left_%d.png"), 4);
    atlas_2P_run_right.load_from_file(_T("resources/manbo_run_right_%d.png"), 4);

    loadimage(&img_ui_1, _T("resources/ui_1.png"));
    loadimage(&img_ui_2, _T("resources/ui_2.png"));
    loadimage(&img_ui_3, _T("resources/ui_3.png"));
    loadimage(&img_ui_fight, _T("resources/ui_fight.png"));
    loadimage(&img_ui_textbox, _T("resources/ui_textbox.png"));
    loadimage(&img_background, _T("resources/background.png"));

    load_audio(_T("resources/bgm.mp3"), _T("bgm"));
    load_audio(_T("resources/1p_win.mp3"), _T("1p_win"));
    load_audio(_T("resources/2p_win.mp3"), _T("2p_win"));
    load_audio(_T("resources/click_1.mp3"), _T("click_1"));
    load_audio(_T("resources/click_2.mp3"), _T("click_2"));
    load_audio(_T("resources/click_3.mp3"), _T("click_3"));
    load_audio(_T("resources/click_4.mp3"), _T("click_4"));
    load_audio(_T("resources/ui_1.mp3"), _T("ui_1"));
    load_audio(_T("resources/ui_2.mp3"), _T("ui_2"));
    load_audio(_T("resources/ui_3.mp3"), _T("ui_3"));
    load_audio(_T("resources/ui_fight.mp3"), _T("ui_fight"));

    std::ifstream file("config.cfg");
    if(!file.good()) {
        MessageBox(hwnd, _T("无法打开配置 config.cfg"), _T("启动失败"), MB_OK | MB_ICONERROR);
        exit(-1);
    }

    std::stringstream str_stream;
    str_stream << file.rdbuf();
    str_address = str_stream.str();

    file.close();
}
1.3 登录到服务器函数
下面便是另一个重要的游戏初始化功能函数了。登录到服务器。我们首先使用先前加载的地址创建HTTP客户端对象。并设置客户端保持连接活跃。
默认状态下,HTTP在发送请求后会断开底层的TCP连接。由于我们的联机游戏在运行的过程中需要频繁同步数据。为了避免断开重连造成的性能损耗,我们在这里建议客户端始终保持连接活跃。
随后便可以向服务端发送login登录请求了。
- 在这之后检查响应的结果。如果无响应或响应状态码异常,则使用弹窗报错后结束程序。
- 若响应正常,就从响应体中取出当前客户端玩家ID的字符串。转化为int类型存储在变量中。
- 特别地,如果服务器返回的玩家ID小于0,则代表比赛已经开始了。
- 之后我们根据玩家id初始化玩家进度。
- 然后获取并保存比赛文本内容到str_text中。
- 下一步便是按行分割字符串了。我们使用stringstream配合getline循环,将单行文本添加到列表中。同时统计游戏所需要输入的文本字符数,来方便实时计算游戏进度。
void login_to_server(HWND hwnd)
{
    client = new httplib::Client(str_address);
    client->set_keep_alive(true);

    httplib::Result result = client->Post("/login");
    if (!result || result->status != 200)
    {
        MessageBox(hwnd, _T("无法连接到服务器!"), _T("启动失败"), MB_OK | MB_ICONERROR);
        exit(-1);
    }

    id_player = std::stoi(result->body);

    if (id_player <= 0)
    {
        MessageBox(hwnd, _T("比赛已经开始啦!"), _T("拒绝加入"), MB_OK | MB_ICONERROR);
        exit(-1);
    }

    (id_player == 1) ? (progress_1 = 0) : (progress_2 = 0);
    str_text = client->Post("/query_text")->body;
}
在这些内容全部完成后,我们客户端联机数据的初始化工作就已经准备好了。考虑到网络通信是一个耗时不稳定的阻塞行为。这是便要开辟单独的数据同步线程了。
我们继续在login_to_server函数最后追加这样的代码。
在这部分内容中,我们使用lambda函数构造了一个线程对象。并将它使用detach进行分离。
分离后的线程与我们的主线程并行执行,相当于创建了一个在后台自动进行的任务。
在 C++ 线程编程中,std::thread 构造函数可以接收可调用对象(函数、函数指针、lambda 等)作为参数,用来指定线程要执行的任务。
用 lambda 函数的优势是:可以直接在创建线程的地方定义任务逻辑,无需单独写函数,代码更简洁,还能方便捕获外部变量(比如 [&] 捕获引用、[=] 捕获值)。
detach() 是 std::thread 的成员函数,作用是将子线程与创建它的主线程 “解绑”:
- 分离后,子线程不再受主线程控制,会由操作系统接管生命周期;
- 主线程退出时,分离的子线程如果还在运行,不会被强制终止(但如果整个进程退出,子线程仍会终止);
- 注意:分离后的线程对象也不能再操作这个线程对象的核心状态。
在这个新线程的代码中,我们使用了一个死循环来不断地与服务器同步数据。每次同步后等待0.1秒再执行下一次循环。
在数据请求部分,我们根据当前的玩家ID选择不同的路由。提交本地的玩家数据后,将返回结果中的另一位玩家进度进行更新。这样我们便可以实现游戏进行的过程中,不断刷新两个玩家的游戏实况。
std::thread([&]()
{
    while(true)
    {
        using namespace std::chrono;

        std::string route = (id_player == 1) ? "/update_1" : "/update_2";
        std::string body = std::to_string((id_player == 1) ? progress_1 : progress_2);
        httplib::Result result = client->Post(route, body, "text/plain");

        if (result && result->status == 200) {
            int progress = std::stoi(result->body);
            (id_player == 1) ? (progress_2 = progress) : (progress_1 = progress);
        }

        std::this_thread::sleep_for(nanoseconds(1000000000 / 10));
    }
}).detach();
总的来说,完整的login_to_server方法的逻辑是这样的
- 先尝试登陆服务器
- 成功后初始化数据并获取游戏文本
- 最后创建独立的数据同步线程
2 入口main函数
本项目中main函数的框架是下面这样的:
游戏的主体由循环构成,我们在内部不断处理玩家输入,更新游戏逻辑并处理画面绘制。当然在这之前我们还需要创建游戏窗口,并初始化游戏中所使用的数据。
int main(int argc, char** argv)
{
    //////////////////// 处理数据初始化 ////////////////////

    while (true)
    {
        //////////////////// 处理玩家输入 ////////////////////

        //////////////////// 处理游戏更新 ////////////////////

        //////////////////// 处理画面绘制 ////////////////////
    }

    return 0;
}
2.1 数据初始化
我们先从初始化部分开始写起。
- 首先创建游戏窗口,设置窗口标题和字体样式,以及字体的背景为透明。
- 接下来再调用我们先前封装好的资源加载函数和登录到服务器函数
需要注意的是原教程中的Ipix字体似乎无法正常显示,所以我修改为了Zpix字体,从网上下载了Zpix字体并放到了resources目录下。
using namespace std::chrono;

HWND hwnd = initgraph(1280, 720 /*, EW_SHOWCONSOLE*/);
SetWindowText(hwnd, _T("哈基米大冒险!"));
settextstyle(28, 0, _T("Zpix"));

setbkmode(TRANSPARENT);

load_resources(hwnd);
login_to_server(hwnd);
紧接着构造和初始化我们的游戏中所使用的游戏对象。
- mes对象用于在消息循环中暂存玩家的输入消息
- timer_countdown用来控制游戏开始时的起跑倒计时
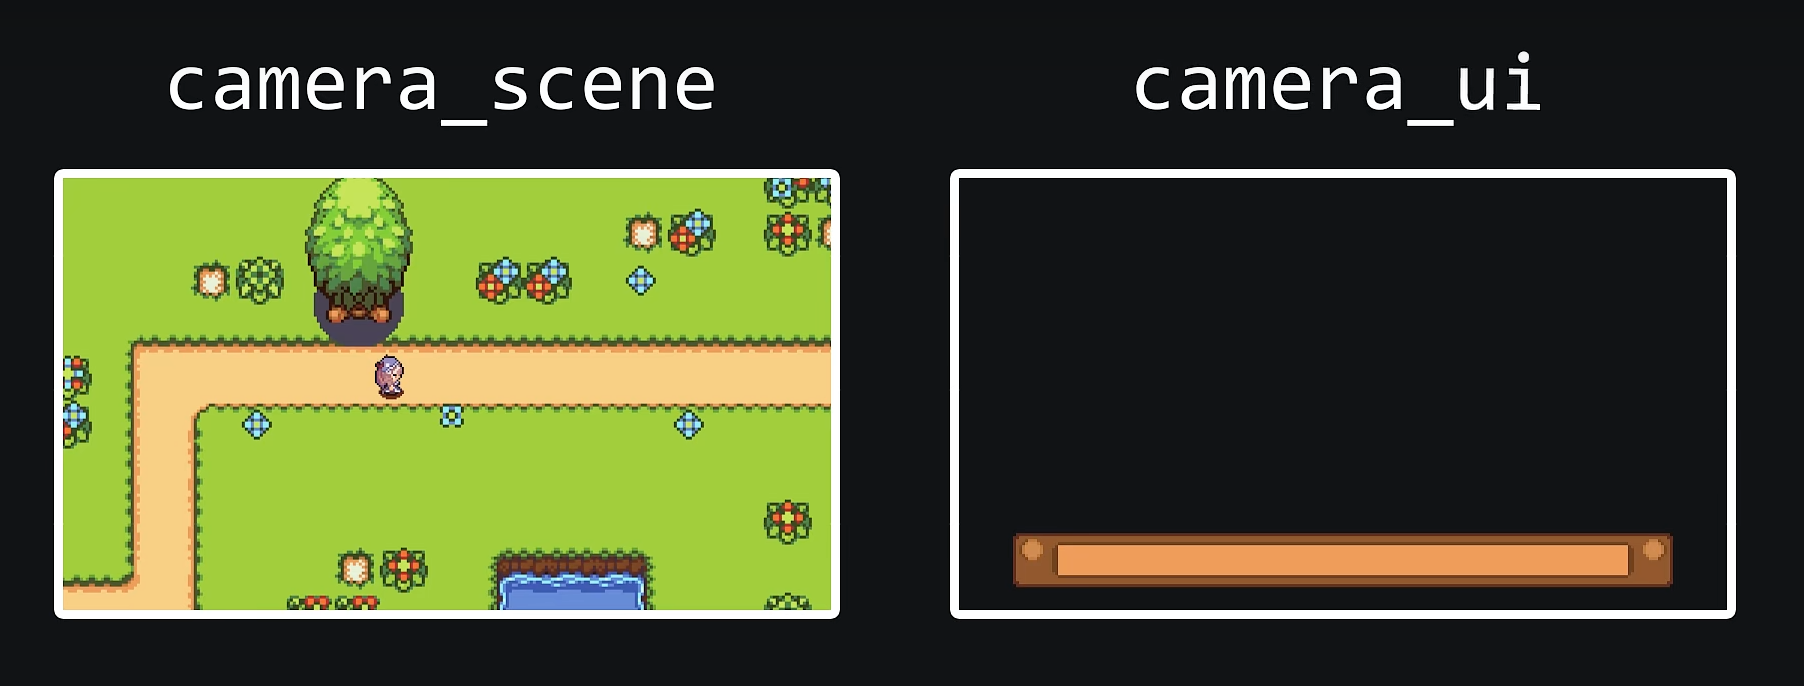
- 需要注意的是,我们使用了两个摄像机对象。
这是因为我们将画面分成了两个图层进行渲染,跟随玩家移动的世界元素使用camera_scene场景摄像机进行渲染。而游戏中文本框等固定不动的内容则使用camera_ui进行渲染。
ExMessage msg;
Timer timer_countdown;
Camera camera_ui, camera_scene;
Player player_1(&atlas_1P_idle_up, &atlas_1P_idle_down, &atlas_1P_idle_left, &atlas_1P_idle_right,
            &atlas_1P_run_up, &atlas_1P_run_down, &atlas_1P_run_left, &atlas_1P_run_right);
Player player_2(&atlas_2P_idle_up, &atlas_2P_idle_down, &atlas_2P_idle_left, &atlas_2P_idle_right,
                &atlas_2P_run_up, &atlas_2P_run_down, &atlas_2P_run_left, &atlas_2P_run_right);

camera_ui.set_size({1280, 720});
camera_scene.set_size({1280, 720});

player_1.set_position({842, 842});
player_2.set_position({842, 842});
紧接着,我们初始化起跑倒计时所使用的定时器。这部分内容也十分清晰,取消定时器的单次触发,让它可以在游戏更新时每个一秒触发一次。每次触发的逻辑都是递减倒计时计数的值。再根据倒计时的值播放不同的音效。
在倒计时归零时切换游戏阶段状态并开始播放游戏背景音乐。
timer_countdown.set_one_shot(false);
timer_countdown.set_wait_time(1.0f);
timer_countdown.set_callback([&](){
    val_countdown--;
    switch(val_countdown) {
    case 3: play_audio(_T("ui_3")); break;
    case 2: play_audio(_T("ui_2")); break;
    case 1: play_audio(_T("ui_1")); break;
    case 0: play_audio(_T("ui_0")); break;
    case -1:
        stage = Stage::Racing;
        play_audio(_T("bgm"), true);
        break;
    }
});
在正式进入游戏主循环之前,我们还需要写下这样几行代码,定义帧间隔方便动态延时。并开启批量绘图避免闪屏。
const nanoseconds frame_duration(1000000000 / 144);
steady_clock::time_point last_tick = steady_clock::now();
BeginBatchDraw();
2.2 处理玩家输入
在主循环处理玩家输入的部分,我们写下这样的代码。
- 当比赛还没有开始时,我们不需要处理玩家输入,所以直接返回。
- 否则,在输入消息为文本内容时,我们将玩家输入的字符与游戏文本中需要输入的字符进行对比。如果正确则随机播放按键音效。并累加对应玩家的游戏进度。如果当前行文本已经输入结束,那便切换到下一行。
while(peekmessage(&msg)) {
    if (stage!=Stage::Racing) {
        continue;
    }

    if (msg.message == WM_CHAR && idx_line < str_line_list.size()) {
        const std::string& str_line = str_line_list[idx_line];
        if(str_line[idx_char] == msg.ch)
        {
            switch(rand()%4) {
            case 0: play_audio(_T("click_1")); break;
            case 1: play_audio(_T("click_2")); break;
            case 2: play_audio(_T("click_3")); break;
            case 3: play_audio(_T("click_4")); break;
            }

            (id_player == 1) ? progress_1++ : progress_2++;

            idx_char++;
            if (idx_char >= str_line.length()) {
                idx_char = 0;
                idx_line++;
            }
        }
    }
}
2.3 处理游戏更新
在处理游戏更新时,我们首先计算距离上次执行更新实际过去了多少时间.
然后在游戏处于等待另一个玩家加入的状态下,检查两位玩家是否都已经加入到游戏中了。
否则,只需要跟新倒计时定时器就行了。
在正式比赛的部分,我们需要检查两位玩家各自的比赛进度,是否完成了全部字符数,并根据当前客户端玩家的ID给出胜负结果的弹窗,同时播放不同的音效。
除此之外,我们还需要根据玩家当前的打字进度,实时地查询出进度对应的点位坐标,并设置为各自的移动目的地。
最后还需要让场景摄像机始终跟随本地客户端的玩家。
steady_clock::time_point frame_start = steady_clock::now();
duration<float> delta = duration<float>(frame_start - last_tick);

if (stage==Stage::Waitting) {
    if (progress_1 >= 0 && progress_2 >= 0) {
        stage = Stage::Ready;
    }
} else {
    if (stage==Stage::Ready) {
        timer_countdown.on_update(delta.count());
    }
    if ((id_player == 1 && progress_1 >= num_total_char)
        || (id_player == 2 && progress_2 >= num_total_char))
    {
        stop_audio(_T("bgm"));
        play_audio((id_player == 1) ? _T("1p_win") : _T("2p_win"));
        MessageBox(hwnd, _T("赢麻麻!"), _T("游戏结束"), MB_OK | MB_ICONINFORMATION);
        exit(0);
    } else if ((id_player == 1 && progress_2 >= num_total_char)
        || (id_player == 2 && progress_1 >= num_total_char))
    {
        stop_audio(_T("bgm"));
        MessageBox(hwnd, _T("输光光!"), _T("游戏结束"), MB_OK | MB_ICONINFORMATION);
        exit(0);
    }

    player_1.set_target(path.get_position_at_progress((float)progress_1 / num_total_char));
    player_2.set_target(path.get_position_at_progress((float)progress_2 / num_total_char));

    player_1.on_update(delta.count());
    player_2.on_update(delta.count());

    camera_scene.look_at((id_player == 1)
        ? player_1.get_position() : player_2.get_position());
}
2.4 处理画面绘制
我们首先清空上一帧的绘图内容,然后根据当前的游戏状态,依次绘制背景图、玩家对象、倒计时和文本框等画面内容。然后再批量刷新绘图缓冲区将画面真正显示到窗口上。
这部分代码大多是对先前封装好的绘图函数和方法的调用。
setbkcolor(RGB(0, 0, 0));
cleardevice();

if(stage==Stage::Waitting) {
    settextcolor(RGB(195, 195, 195));
    outtextxy(15, 675, _T("比赛即将开始,等待其他玩家加入"));
} else {
    // 绘制背景图
    static const Rect rect_bg =
    {
        0, 0,
        img_background.getwidth(),
        img_background.getheight()
    };
    putimage_ex(camera_scene, &img_background, &rect_bg);

    // 绘制玩家
    if (player_1.get_position().y > player_2.get_position().y) {
        player_2.on_render(camera_scene);
        player_1.on_render(camera_scene);
    } else {
        player_1.on_render(camera_scene);
        player_2.on_render(camera_scene);
    }

    // 绘制倒计时
    switch (val_countdown)
    {
    case 3:
    {
        static const Rect rect_ui_3 =
        {
            1280 / 2 -img_ui_3.getwidth() / 2,
            720 / 2 -img_ui_3.getheight() / 2,
            img_ui_3.getwidth(), img_ui_3.getheight()
        };
        putimage_ex(camera_ui, &img_ui_3, &rect_ui_3);
    }
    break;
    case 2:
    {
        static const Rect rect_ui_2 =
        {
            1280 / 2 -img_ui_2.getwidth() / 2,
            720 / 2 -img_ui_2.getheight() / 2,
            img_ui_2.getwidth(), img_ui_2.getheight()
        };
        putimage_ex(camera_ui, &img_ui_2, &rect_ui_2);
    }
    break;
    case 1:
    {
        static const Rect rect_ui_1 =
        {
            1280 / 2 -img_ui_1.getwidth() / 2,
            720 / 2 -img_ui_1.getheight() / 2,
            img_ui_1.getwidth(), img_ui_1.getheight()
        };
        putimage_ex(camera_ui, &img_ui_1, &rect_ui_1);
    }
    break;
    case 0:
    {
        static const Rect rect_ui_fight =
        {
            1280 / 2 -img_ui_fight.getwidth() / 2,
            720 / 2 -img_ui_fight.getheight() / 2,
            img_ui_fight.getwidth(), img_ui_fight.getheight()
        };
        putimage_ex(camera_ui, &img_ui_fight, &rect_ui_fight);
    }
    break;
    default: break;
    }

    // 绘制界面
    if (stage==Stage::Racing) {
        static const Rect rect_textbox =
        {
            0,
            720 - img_ui_textbox.getwidth(),
            img_ui_textbox.getwidth(),
            img_ui_textbox.getheight()
        };
        static std::wstring_convert<std::codecvt_utf8<wchar_t>, wchar_t> convert;
        std::wstring wstr_line = convert.from_bytes(str_line_list[idx_line]);
        std::wstring wstr_completed = convert.from_bytes(str_line_list[idx_line].substr(0, idx_char));
        putimage_ex(camera_ui, &img_ui_textbox, &rect_textbox);
        settextcolor(RGB(125, 125, 125));
        outtextxy(185 + 2, rect_textbox.y + 65 + 2, wstr_line.c_str());
        settextcolor(RGB(25, 25, 25));
        outtextxy(185, rect_textbox.y + 65, wstr_line.c_str());
        settextcolor(RGB(0, 149, 217));
        outtextxy(185, rect_textbox.y + 65, wstr_completed.c_str());
    }
}

FlushBatchDraw();
我们重点关注一下绘图界面中对于文本的渲染。在默认使用Unicode的项目配置下,EasyX中文本绘图所需的参数是宽字符字符串,而我们通过网络传输的文本内容,是utf-8编码并使用string存储的。所以在这里便需要使用convert对象进行字符串的编码转换。
在我写代码时,如果把代码写得和视频中一样,会直接提示错误. 因为在我的项目中TCHAR表示的是char, 因此LPCSTR表示的是char *,而不是wchar_t *。也就是说这里outtextxy接受的参数应该是char *类型,但我们传入的是wchar_t *类型。所以在语法检查时会直接报错。
为了解决这个问题,我们可以考虑不转化为wchar_t,而是直接使用char *. 那么我们的代码可以这样写
std::string str_line = str_line_list[idx_line];
std::string str_completed = str_line.substr(0, idx_char);
putimage_ex(camera_ui, &img_ui_textbox, &rect_textbox);
settextcolor(RGB(125, 125, 125));
outtextxy(185 + 2, rect_textbox.y + 65 + 2, str_line.c_str());
settextcolor(RGB(25, 25, 25));
outtextxy(185, rect_textbox.y + 65, str_line.c_str());
settextcolor(RGB(0, 149, 217));
outtextxy(185, rect_textbox.y + 65, str_completed.c_str());
但是这会导致渲染中文时出现乱码。虽然我们的游戏并不支持输入中文,但我还是想探索一下为什么。
首先是第一个问题:其实utf-8是可以表示中文的,而且它也是以char类型进行存储的,那又为什会把中文渲染成乱码呢?
这是因为outtextxy的两个函数重载(使用char*和wchar_t*)分别对应 MBCS(多字节字符集) 和 unicode 两种字符集。虽然 utf8 和 MBCS 一样也是以8bit为单位进行编码的,但是它使用的字符集并不是 MBCS。所以会导致渲染中文时出现乱码。
因此为了把 utf8 转化为 MBCS,我们可以编写下面这个函数。
- 这个函数的核心功能是将 UTF-8 编码 的字符串转换为系统的 ACP(ANSI Code Page,ANSI 代码页) 编码。对于中文来说,就会把 UTF-8 编码的中文转化为 GBK 编码。
- 函数名中的
fallback表示“降级/兜底”,即当转换失败时,不会直接报错,而是执行预设的兜底逻辑。
inline std::string utf8_to_acp_fallback(const std::string &text)
{
    if (text.empty())
    {
        return {};
    }

    // 先尝试按 UTF-8 解码;若失败(输入并非 UTF-8),则直接回退原始字节串(通常已是 ACP/GBK)。
    int wide_len = MultiByteToWideChar(CP_UTF8, MB_ERR_INVALID_CHARS, text.c_str(), -1, nullptr, 0);
    if (wide_len <= 0)
    {
        return text;
    }

    std::wstring wide(static_cast<size_t>(wide_len), L'\0');
    if (MultiByteToWideChar(CP_UTF8, MB_ERR_INVALID_CHARS, text.c_str(), -1, wide.data(), wide_len) <= 0)
    {
        return text;
    }

    int acp_len = WideCharToMultiByte(CP_ACP, 0, wide.c_str(), -1, nullptr, 0, nullptr, nullptr);
    if (acp_len <= 0)
    {
        return text;
    }

    std::string acp(static_cast<size_t>(acp_len), '\0');
    if (WideCharToMultiByte(CP_ACP, 0, wide.c_str(), -1, acp.data(), acp_len, nullptr, nullptr) <= 0)
    {
        return text;
    }

    if (!acp.empty() && acp.back() == '\0')
    {
        acp.pop_back();
    }
    return acp;
}
使用这个函数之后,中午就可以正常显示了。
前面我说到我的项目中TCHAR表示的是char,其实这是因为我们没有定义unicode对应的宏定义。 那么第二个问题就是: 我们能够通过添加unicode对应的宏定义,让原教程的代码也能跑通呢?答案是可以的。
我们需要在CMakeLists中(可以是项目总的CMakeLists)添加一行, 启用unicode相关的宏定义,让TCHAR表示wchat_t,
add_definitions(-DUNICODE -D_UNICODE)
此时如果直接编译教程中的代码会有ld的报错,提示说找不到参数列表对应
wchar_t*的loadimage等函数。这是因为我们链接的
libeasyx.a 中没有使用wchar的loadimage等函数的实现。其实这些实现都在libeasyxw.a中。所以我们把项目顶层的CMakeLists.txt中的下面这条
set(EasyX_LIB_PATH "${EasyX_LIB_DIR}/libeasyx.a")
修改为
set(EasyX_LIB_PATH "${EasyX_LIB_DIR}/libeasyxw.a")
之后,就能成功编译原教程对应的代码了。
static std::wstring_convert<std::codecvt_utf8<wchar_t>, wchar_t> convert;
std::wstring wstr_line = convert.from_bytes(str_line_list[idx_line]);
std::wstring wstr_completed = convert.from_bytes(str_line_list[idx_line].substr(0, idx_char));
putimage_ex(camera_ui, &img_ui_textbox, &rect_textbox);
settextcolor(RGB(125, 125, 125));
outtextxy(185 + 2, rect_textbox.y + 65 + 2, wstr_line.c_str());
settextcolor(RGB(25, 25, 25));
outtextxy(185, rect_textbox.y + 65, wstr_line.c_str());
settextcolor(RGB(0, 149, 217));
outtextxy(185, rect_textbox.y + 65, wstr_completed.c_str());
参考:
CLion + MinGW 使用 EasyX 输出中文乱码的解决方案 - CodeBus
ASCII、ANSI、MBCS、UNICODE字符集详解_sap spain 字符集-CSDN博客
2.5 动态延时
当然,在FlushBatchDraw之后,也就是主循环最后的部分,我们需要编写这样的代码。计算动态延时的时间来保持帧率稳定。
last_tick = frame_start;
nanoseconds sleep_duration = frame_duration - (steady_clock::now() - frame_start);
if (sleep_duration > nanoseconds(0)) {
    std::this_thread::sleep_for(sleep_duration);
}
3 配置资源目录
最后,我们打开client客户端工程所在的文件夹,将资源包resources目录复制到这里。
由于我使用了CMakeLists来配置项目,client和server两个exe程序分别放在了build下的client和server目录下。
为了方便,我们想把两个可执行文件都声称在build/bin目录下。所以在根CMakeLists.txt中添加
set(CMAKE_RUNTIME_OUTPUT_DIRECTORY ${CMAKE_BINARY_DIR}/bin)
与此同时,我们需要修改launch.json中的exe文件路径
{
    // 使用 IntelliSense 了解相关属性。
    // 悬停以查看现有属性的描述。
    // 欲了解更多信息,请访问: https://go.microsoft.com/fwlink/?linkid=830387
    "version": "0.2.0",
    "configurations": [
        {
            "name": "Run Server",
            "type": "cppvsdbg",
            "request": "launch",
            "program": "${workspaceFolder}/build/bin/server.exe",
            "args": [],
            "stopAtEntry": false,
            "cwd": "${workspaceFolder}",
            "environment": [],
            "console": "externalTerminal",
        },

        {
            "name": "Run Client",
            "type": "cppvsdbg",
            "request": "launch",
            "program": "${workspaceFolder}/build/bin/client.exe",
            "args": [],
            "stopAtEntry": false,
            "cwd": "${workspaceFolder}",
            "environment": [],
            "console": "externalTerminal"
        }
    ],
    "compounds": [
        {
            "name": "Run Server & Client",
            "configurations": ["Run Server", "Run Client"],
            "stopAll": true
        }
    ]
}
之后,我们把resources文件夹放到build/bin目录下
然后,我们在build/bin目录中新建config.cfg,并在其中写下我们的服务器地址。
localhost:25565
之后build/bin中新建text.txt,并在其中写下游戏中比赛的文本内容。
It was terribly cold and nearly dark on the last evening
of the old year, and the snow was falling fast.
In the cold and the darkness, a poor little girl,
with bare head and naked feet, roamed through the
streets. It is true she had on a pair of slippers when
she left home, but they were not of much use.
They were very large, so large, indeed, that they had
belonged to her mother, and the poor little creature
had lost them in running across the street to avoid
two carriages that were rolling along at a terrible rate.
One of the slippers she could not find, and a boy
seized upon the other and ran away with it, saying that
he could use it as a cradle, when he had children of his
own. So the little girl went on with her little naked feet,
which were quite red and blue with the cold. In an old
apron she carried a number of matches, and had a
bundle of them in her hands. No one had bought anything
of her the whole day, nor had any one given here even
a penny. Shivering with cold and hunger, she crept along;
poor little child, she looked the picture of misery.
The snowflakes fell on her long, fair hair, which hung
in curls on her shoulders, but she regarded them not.
之后我们就能编译程序并运行了。运行时,记得先运行一个server.exe, 之后运行两个client.exe
评论
如果你已登录 GitHub,就可以直接在这里评论。