04-玩家路径查询与帧间平滑插值移动
【从零开始的C++游戏开发】玩家路径查询与帧间平滑插值移动 | EasyX制作哈基米大冒险_哔哩哔哩_bilibili
1 平滑与插值
1.1 渲染帧、逻辑帧和网络帧
首先我们需要区分渲染帧、逻辑帧和网络帧这三种不同的概念。
- 日常提到的60Hz或者更高的刷新率,一般指的是画面渲染的绘图任务
- 物理系统脚本系统等逻辑帧的执行速度可能固定在60Hz或更低一些
- 而在联机游戏中数据同步的网络帧,考虑到成本和必要性,这个频率可能会更低

在联机游戏的开发中,我们如果需要每隔100ms同步一次网络数据。但需要每隔16ms左右刷新一次画面。画面更新的速度会远快于游戏世界中状态同步的速度。
那么在某些渲染帧中,场景中玩家等物体的位置就不会发生移动。在宏观上就会出现卡顿感。那么如何兼容低频率的网络同步与高频率的画面渲染。这就触及到游戏开发的零杠一个热门话题了——平滑与插值。
1.2 需求分析
我们暂时抛开网络联机相关的内容,只考虑单机的情况。我们要实现一个单机打字游戏。每当我们敲下正确的字符,画面中的游戏玩家都向前一段距离。如果我们不进行平滑处理,每次移动都是瞬移到对应进度的位置,那么画面也是同样会出现一蹦一跳的卡顿感。在联机存在的情况下,无非只是说这种玩家位置的设置来自于服务器的数据同步。
我们在本地设置玩家位置时,需要让角色从上一帧已存在的位置,平滑地向着目标位置进行移动。这个移动的过程可能跨越多个渲染帧。每次移动都是小步挪动,而不是在一帧之内直接设置坐标到达目标位置。
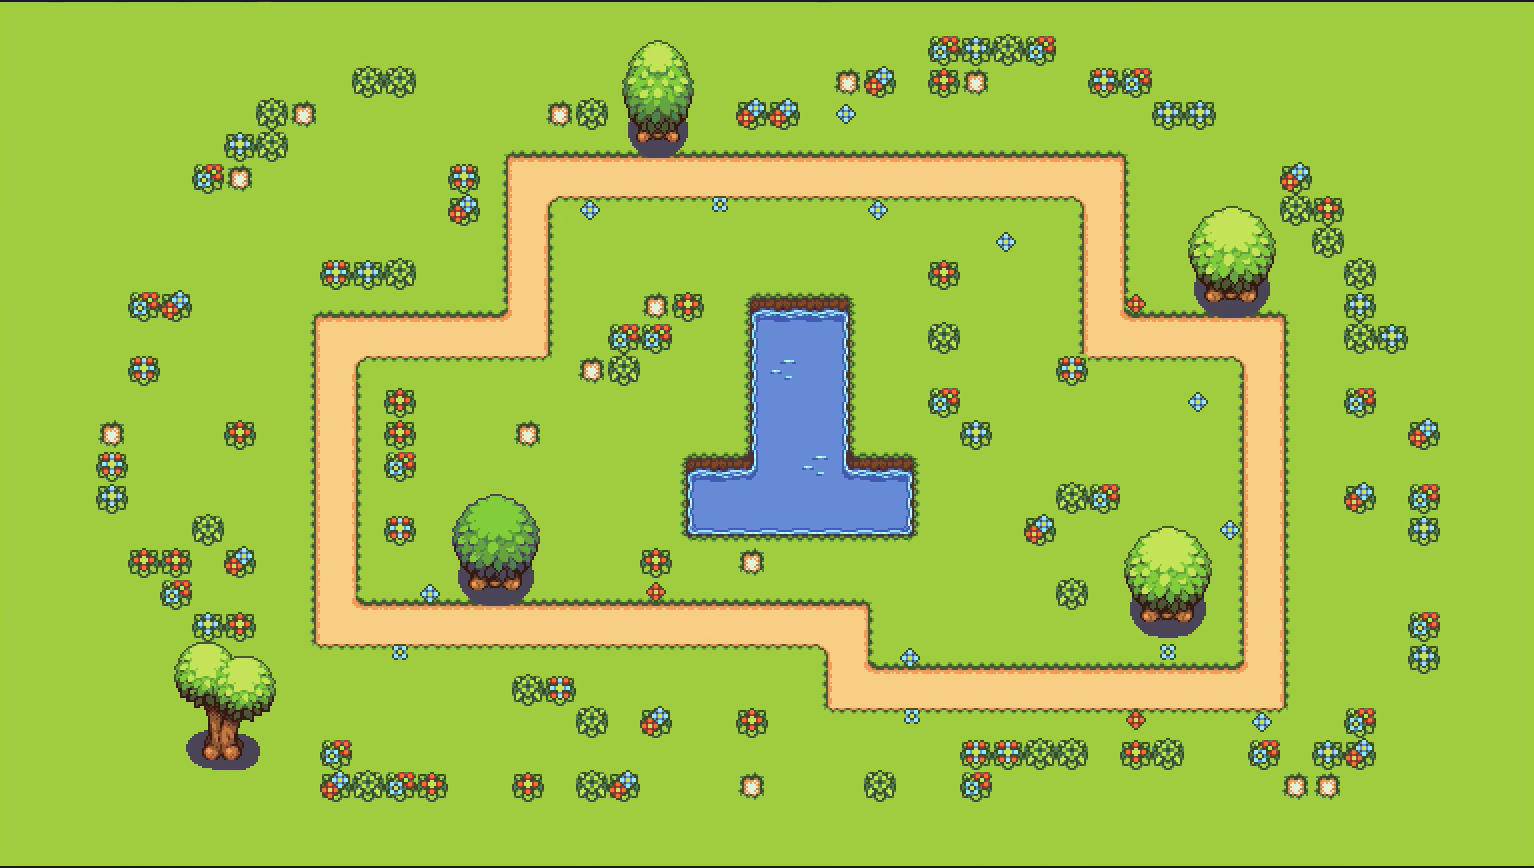
我们首先观察一下游戏地图,游戏地图素材是一个完整的图片。其中已经完整地绘制了玩家移动的路径。
对应顶点的坐标我们进行一下标注
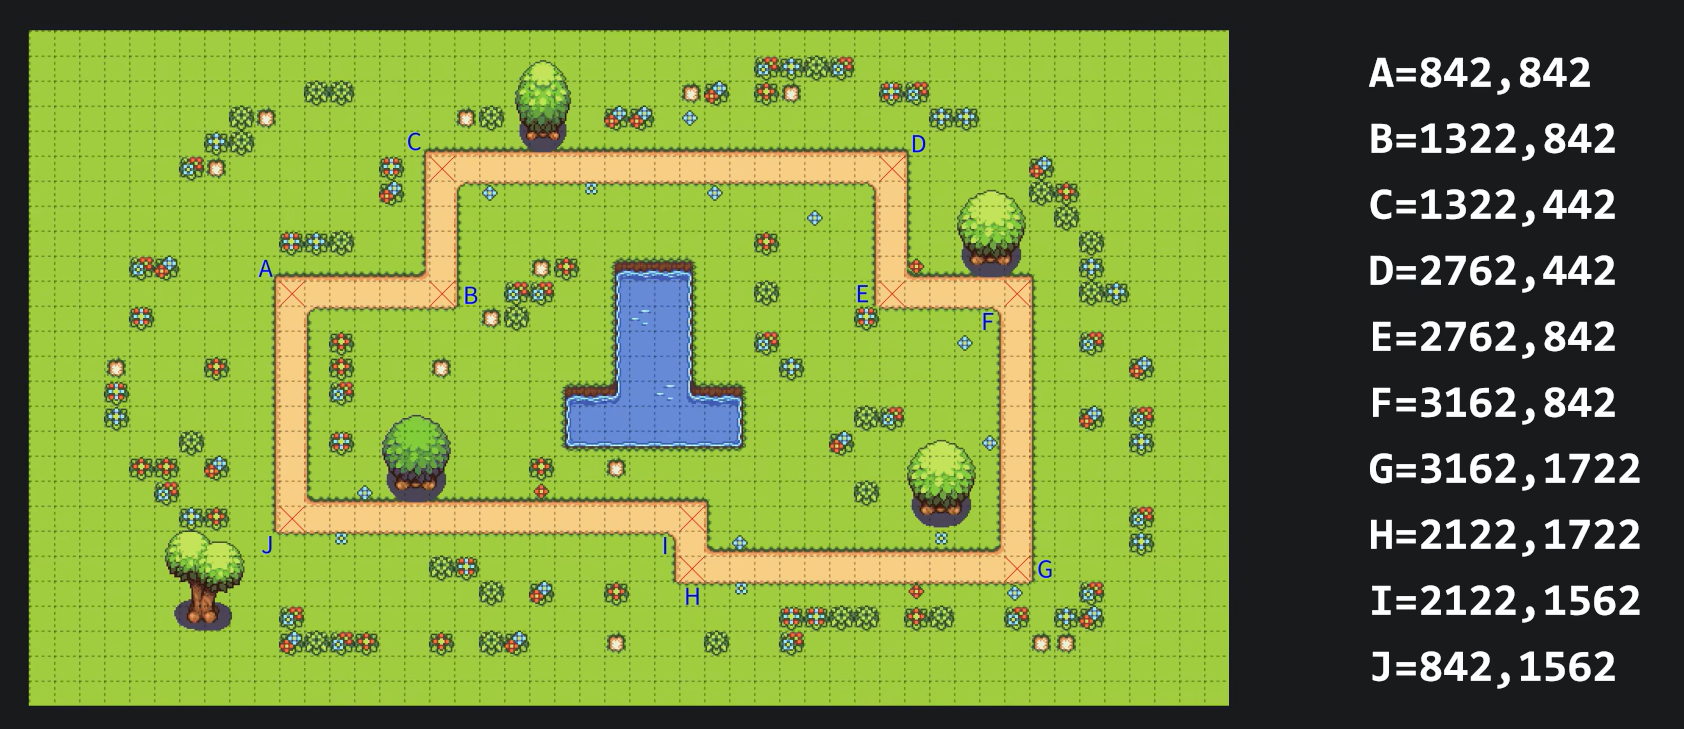
所以我们首先要做的是在给定任意进度的情况下,都能够得到地图上对应的坐标位置。也就是说要完成游戏进度到地图坐标的映射。这是我们进行角色平滑移动的基础。所以我们首先创建path头文件.
2 Path类实现
Path类是对角色移动路径的封装,我们希望可以通过它记录的路径顶点计算任意进度的路径坐标。
- total_length是计算得到的路径总长度。
- point_list存储着所有顶点的位置坐标。
- segment_len_list则是每两个顶点之间的路径片段长度列表。
Path类的构造函数需要传入顶点列表数组
#include "vector2.h"
#include <vector>

class Path
{
public:
    Path(const std::vector<Vector2>& point_list)
    {
        this->point_list = point_list;

        for (size_t i = 1; i < point_list.size(); i++) {
            float segment_len = (point_list[i] - point_list[i - 1]).length();
            segment_len_list.push_back(segment_len);
            total_length += segment_len;
        }
    }
    ~Path() = default;
private:
    float total_length = 0;
    std::vector<Vector2> point_list;
    std::vector<float> segment_len_list;
};
之后我们需要封装一个用来获取指定进度路径坐标的方法。我们传入0到1之间的浮点数作为路径上前进的进度值,对外返回一个计算得到的二维坐标。
- 在实现这个方法时,我们先对边界情况进行处理。
- 之后遍历定点列表,累加找到当前进度对应的路径片段,进行线性插值
Vector2 get_position_at_progress(float progress) const
{
    if (progress <= 0) return point_list.front();
    if (progress >= 1) return point_list.back();

    float target_distance = total_length * progress;
    float accumulated_len = 0.0f;
    for (size_t i = 1; i < point_list.size(); i++) {
        accumulated_len += segment_len_list[i - 1];
        if (accumulated_len >= target_distance) {
            float segment_progress = (target_distance - (accumulated_len - segment_len_list[i - 1])) / segment_len_list[i - 1];
            return point_list[i - 1] + (point_list[i] - point_list[i - 1]) * segment_progress;
        }
    }

    return point_list.back();
}
3 玩家类实现
class Player
{
public:
    enum class Facing
    {
        Up, Down, Left, Right
    };

public:
    Player(Atlas* atlas_idle_up, Atlas* atlas_idle_down, Atlas* atlas_idle_left, Atlas* atlas_idle_right,
        Atlas* atlas_run_up, Atlas* atlas_run_down, Atlas* atlas_run_left, Atlas* atlas_run_right)
    {

    }
    ~Player() = default;

private:
    const float SPEED_RUN = 100.0f;

private:
    Vector2 position;
    Vector2 velocity;
    Vector2 pos_target;

    Animation anim_idle_up;
    Animation anim_idle_down;
    Animation anim_idle_left;
    Animation anim_idle_right;
    Animation anim_run_up;
    Animation anim_run_down;
    Animation anim_run_left;
    Animation anim_run_right;
    Animation *current_animation = nullptr;

    Facing facing = Facing::Down;
};
在构造函数部分,我们写下这样的代码来初始化八个动画对象。
Player(Atlas* atlas_idle_up, Atlas* atlas_idle_down, Atlas* atlas_idle_left, Atlas* atlas_idle_right,
    Atlas* atlas_run_up, Atlas* atlas_run_down, Atlas* atlas_run_left, Atlas* atlas_run_right)
{
    anim_idle_up.set_loop(true);
    anim_idle_up.set_interval(0.1f);
    anim_idle_up.add_frame(atlas_idle_up);

    anim_idle_down.set_loop(true);
    anim_idle_down.set_interval(0.1f);
    anim_idle_down.add_frame(atlas_idle_down);

    anim_idle_left.set_loop(true);
    anim_idle_left.set_interval(0.1f);
    anim_idle_left.add_frame(atlas_idle_left);

    anim_idle_right.set_loop(true);
    anim_idle_right.set_interval(0.1f);
    anim_idle_right.add_frame(atlas_idle_right);

    anim_run_up.set_loop(true);
    anim_run_up.set_interval(0.1f);
    anim_run_up.add_frame(atlas_run_up);

    anim_run_down.set_loop(true);
    anim_run_down.set_interval(0.1f);
    anim_run_down.add_frame(atlas_run_down);

    anim_run_left.set_loop(true);
    anim_run_left.set_interval(0.1f);
    anim_run_left.add_frame(atlas_run_left);

    anim_run_right.set_loop(true);
    anim_run_right.set_interval(0.1f);
    anim_run_right.add_frame(atlas_run_right);
}
在on_update方法中,如果玩家当前的位置没有到达目标位置处,便计算目标位置和当前位置作差得到的单位向量,乘以移动速度大小得到移动速度向量。否则把玩家速度设置为0.
随后根据速度修改玩家的位置坐标。
首先应该判断玩家在当前帧时间中移动的距离是否会越过目标点,如果越过目标位置,则意味着玩家在当前帧中就已经可以到达目标处。否则继续想着当前移动的速度方向移动对应的位置。
随后的内容就是根据速度大小和玩家朝向枚举设置当前动画对象。对水平和数值两个方向的速度大小分别进行了判断。
void on_update(float delta)
{
    if (!position.approx(pos_target)) {
        velocity = (pos_target - position).normalized() * SPEED_RUN;
    } else {
        velocity = Vector2(0, 0);
    }

    if ((pos_target - position).length()<=(velocity*delta).length()) {
        position = pos_target;
        position += velocity * delta;
    }

    if (velocity.approx(Vector2(0,0))) {
        switch(facing)
        {
        case Player::Facing::Up:    current_anim = &anim_idle_up;     break;
        case Player::Facing::Down:  current_anim = &anim_idle_down;   break;
        case Player::Facing::Left:  current_anim = &anim_idle_left;   break;
        case Player::Facing::Right: current_anim = &anim_idle_right;  break;
        }
    } else {
        if (abs(velocity.y) >= 0.0001f) {
            facing = (velocity.y > 0) ? Player::Facing::Down : Player::Facing::Up;
        } else {
            facing = (velocity.x > 0) ? Player::Facing::Right : Player::Facing::Left;
        }
    }

    if (!current_anim) return;
    current_anim->set_position(position);
    current_anim->on_update(delta);
}
为了比较当前位置是否与目标位置相等,我们为vector2类编写了一个approx方法
bool approx(Vector2 vec)
{
    return (abs(x - vec.x) <= 0.00001f && abs(y - vec.y) <= 0.00001f);
}
之后,我们编写on_render等方法.
在on_render渲染方法中,我们只需要调用动画对象的on_render方法即可,注意还需要使用传入的摄像机作为对象。因此在Animaiton方法内需要实现一个带有摄像机参数的on_render方法重载。
void on_render(const Camera& camera)
{
    if (!current_anim) return;
    current_anim->on_render(camera);
}

void set_position(const Vector2& position)
{
    this->position = position;
}

const Vector2& get_position() const
{
    return position;
}

void set_target(const Vecotr2& pos_target)
{
    this->pos_target = pos_target;
}
本项目中玩家类的逻辑并不复杂,我们可以把它抽象地看作是一个可以平滑地向着目标点移动地动画对象。
至此《哈基米大冒险》所有的基础架构就都封装完成了。
评论
如果你已登录 GitHub,就可以直接在这里评论。