05-武士零玩家角色类详细实现
1 Player类声明
首先我们实现Player类,新建player.h
1.1 成员变量
玩家可以通过按S键或下方向键来想着面朝的方向翻滚,期间处于无敌状态
我们利用两个计时器,并配合相应的bool变量来控制翻滚和攻击的cd。
之后利用一系列bool变量来标志各个操作按键是否按下。
然后定义了攻击的动画,攻击的方向,和当前动画指针。
最后是jump和land的动画,以及指示它的bool变量。
class Player : public Character
{
public:
    enum class AttackDir
    {
        Up, Down, Left, Right
    };

private:
    Timer timer_roll_cd;
    bool is_rolling = false;
    bool is_roll_cd_comp = true;

    Timer timer_attack_cd;
    bool is_attacking = false;
    bool is_attack_cd_comp = true;

    bool is_left_key_down = false;
    bool is_right_key_down = false;
    bool is_jump_key_down = false;
    bool is_roll_key_down = false;
    bool is_attack_key_down = false;

    Animation animation_slash_up;
    Animation animation_slash_down;
    Animation animation_slash_left;
    Animation animation_slash_right;
    AttackDir attack_dir = AttackDir::Right;
    Animation *current_slash_animation = nullptr;

    bool is_jump_vfx_visible = false;
    Animation animation_jump_vfx;

    bool is_land_vfx_visible = false;
    Animation animation_land_vfx;
};
对于玩家角色所需的常量,我们需要定义翻滚和攻击的CD,以及角色运动的速度。
private:
    const float CD_ROLL = 0.75f;
    const float CD_ATTACK = 0.5f;
    const float SPEED_RUN = 300.0f;
    const float SPEED_JUMP = 780.0f;
    const float SPEED_ROLL = 800.0f;
对于公共方法的设计,我们可以从两个思路着手。继承自基类需要重写的方法,以及玩家角色自身所特有的为了方便外部控制的扩展方法。
1.2 基本方法声明
我们在重写方法时,都添加了override关键字,这就确保了在编译时检查重写方法的一致性。避免因为函数签名不同而错过了调用重写的逻辑。
public:
    Player();
    ~Player();

    void on_input(const ExMessage &msg) override;
    void on_update(float delta) override;
    void on_render() override;

    void on_hurt() override;
1.3 状态接口
而Player类所特有的方法,尤其是翻滚的一组,我们可以设置和获取当前的翻滚状态。并且提供了一个can_roll的接口,来检查当前是否可以跳转到翻滚状态。可以翻滚的条件是翻滚的cd结束、当前没有处于翻滚状态中并且翻滚的按键被按下。
void set_rolling(bool flag)
{
    is_rolling = flag;
}

bool get_rolling() const
{
    return is_rolling;
}

bool can_roll() const
{
    return is_roll_cd_comp && !is_rolling && is_roll_key_down;
}
攻击状态也是有相同的接口,设置和检查状态,以及对当前是否可以进入到攻击状态的检查。
我们封装了这些意义明确的方法,来方便后续在具体的状态机节点中直接进行调用。
虽然这些方法内容的逻辑并不复杂,但是如果我们直接将这些状态变量暴露给状态机节点,一方面破化了面向对象的封装性原则,另一方面也会导致状态机内的代码语义更加混乱。
同时多种条件组合的编写也增加了产生人为失误的机会。
void set_attacking(bool flag)
{
    is_attacking = flag;
}

bool get_attacking() const
{
    return is_attacking;
}

bool can_attack() const
{
    return is_attack_cd_comp && !is_attacking && is_attack_key_down;
}
对于跳跃这个动作,我们也封装了can_jump方法。只有当角色处于地面上且跳跃按键按下时才可以跳跃。
而对应状态的set-get方法就不是很有必要了,因为重力模拟的下落会结束跳跃坠落的动作。而is_on_floor方法已经在Character基类中定义过了。
bool can_jump() const
{
    return is_on_floor() && is_jump_key_down;
}
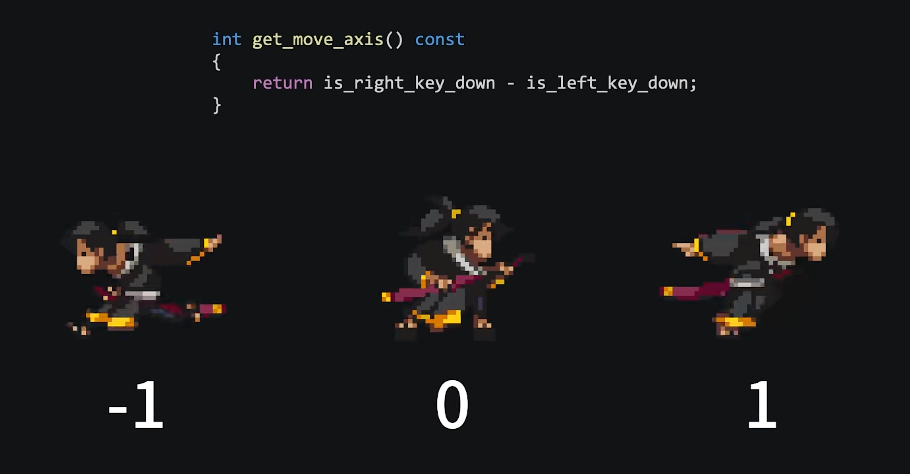
除去关于角色状态的这部分方法之外,我们还提供了两个简单的接口,获取角色移动方向和获取攻击方向枚举。
角色移动方向的接口返回一个整数,我们把右左方向键的状态相减,-1表示角色在向左移动,1表示角色在向右移动,0表示角色没有移动。
int get_move_axis() const
{
    return is_right_key_down - is_left_key_down;
}

AttackDir get_attack_dir() const
{
    return attack_dir;
}
1.4 特殊方法声明
进入到对应行动状态后,执行具体的代码逻辑。我们也添加了这样几个方法定义。来执行具体的修改角色速度,特效动画播控等功能。
void on_jump();
void on_land();
void on_roll();
void on_attack();
在类声明部分的最后,我们追加了一个私有的工具方法。用来传入鼠标点击的坐标,计算转化为攻击的方向。这部分同样先只在这里编写声明,
private:
    void update_attack_dir(int x, int y);
2 Player类实现
2.1 初始化
之后在player.cpp源代码文件中,我们编写Player的构造方法
我们将hit_box的layer_dst设置为Enemy,将hurt_box的layer_src设置为Player。这与Qt中信号(signal)与槽(slot)的概念很像了。
我们也可以将其归纳于“观察者模式”下,碰撞箱发生碰撞就像是一个信号,在出发后激活对应的行为,也就是生命值减少的逻辑。
虽然我们目前阶段还没有抽象出更复杂的自定义消息机制,应用于整体的游戏框架。但这种设计模式,已经是可以被逐渐理解和应用的了。
Player::Player()
{
    is_facing_left = false;
    position = {250, 200};
    logic_height = 120;

    hit_box->set_size({150, 150});
    hurt_box->set_size({40, 40});

    hit_box->set_layer_src(CollisionLayer::None);
    hit_box->set_layer_dst(CollisionLayer::Enemy);

    hurt_box->set_layer_src(CollisionLayer::Player);
    hurt_box->set_layer_dst(CollisionLayer::None);

    hit_box->set_enable(false);
    hurt_box->set_on_collide([&]()
        { decrease_hp(); });
}
然后便是翻滚闪避冷却和攻击冷却计时器的初始化了
timer_roll_cd.set_wait_time(CD_ROLL);
timer_roll_cd.set_one_shot(true);
timer_roll_cd.set_callback([&]()
    { is_roll_cd_comp = true; });

timer_attack_cd.set_wait_time(CD_ATTACK);
timer_attack_cd.set_one_shot(true);
timer_attack_cd.set_callback([&]()
    { is_attack_cd_comp = true; });
接下来,便是动画对象的初始化了
首先需要创建名为attack的动画组对象。
AnimationGroup& animation_attack = animation_pool["attack"];

Animation &animation_attack_left = animation_attack.left;
animation_attack_left.set_interval(0.05f);
animation_attack_left.set_loop(false);
animation_attack_left.set_anchor_mode(Animation::AnchorMode::BottomCentered);
animation_attack_left.add_frame(ResourcesManager::instance()->find_image("player_attack_left"), 5);

Animation &animation_attack_right = animation_attack.right;
animation_attack_right.set_interval(0.05f);
animation_attack_right.set_loop(false);
animation_attack_right.set_anchor_mode(Animation::AnchorMode::BottomCentered);
animation_attack_right.add_frame(ResourcesManager::instance()->find_image("player_attack_right"), 5);
其他代码也是这样
AnimationGroup& animation_dead = animation_pool["dead"];

Animation& animation_dead_left = animation_dead.left;
animation_dead_left.set_interval(0.1f);
animation_dead_left.set_loop(false);
animation_dead_left.set_anchor_mode(Animation::AnchorMode::BottomCentered);
animation_dead_left.add_frame(ResourcesManager::instance()->find_image("player_dead_left"), 6);

Animation& animation_dead_right = animation_dead.right;
animation_dead_right.set_interval(0.1f);
animation_dead_right.set_loop(false);
animation_dead_right.set_anchor_mode(Animation::AnchorMode::BottomCentered);
animation_dead_right.add_frame(ResourcesManager::instance()->find_image("player_dead_right"), 6);


AnimationGroup& animation_fall = animation_pool["fall"];

Animation& animation_fall_left = animation_fall.left;
animation_fall_left.set_interval(0.15f);
animation_fall_left.set_loop(true);
animation_fall_left.set_anchor_mode(Animation::AnchorMode::BottomCentered);
animation_fall_left.add_frame(ResourcesManager::instance()->find_image("player_fall_left"), 5);

Animation& animation_fall_right = animation_fall.right;
animation_fall_right.set_interval(0.15f);
animation_fall_right.set_loop(true);
animation_fall_right.set_anchor_mode(Animation::AnchorMode::BottomCentered);
animation_fall_right.add_frame(ResourcesManager::instance()->find_image("player_fall_right"), 5);

AnimationGroup& animation_idle = animation_pool["idle"];

Animation& animation_idle_left = animation_idle.left;
animation_idle_left.set_interval(0.15f);
animation_idle_left.set_loop(true);
animation_idle_left.set_anchor_mode(Animation::AnchorMode::BottomCentered);
animation_idle_left.add_frame(ResourcesManager::instance()->find_image("player_idle_left"), 5);

Animation& animation_idle_right = animation_idle.right;
animation_idle_right.set_interval(0.15f);
animation_idle_right.set_loop(true);
animation_idle_right.set_anchor_mode(Animation::AnchorMode::BottomCentered);
animation_idle_right.add_frame(ResourcesManager::instance()->find_image("player_idle_right"), 5);


AnimationGroup& animation_jump = animation_pool["jump"];

Animation& animation_jump_left = animation_jump.left;
animation_jump_left.set_interval(0.15f);
animation_jump_left.set_loop(false);
animation_jump_left.set_anchor_mode(Animation::AnchorMode::BottomCentered);
animation_jump_left.add_frame(ResourcesManager::instance()->find_image("player_jump_left"), 5);

Animation& animation_jump_right = animation_jump.right;
animation_jump_right.set_interval(0.15f);
animation_jump_right.set_loop(false);
animation_jump_right.set_anchor_mode(Animation::AnchorMode::BottomCentered);
animation_jump_right.add_frame(ResourcesManager::instance()->find_image("player_jump_right"), 5);


AnimationGroup& animation_roll = animation_pool["roll"];

Animation& animation_roll_left = animation_roll.left;
animation_roll_left.set_interval(0.05f);
animation_roll_left.set_loop(false);
animation_roll_left.set_anchor_mode(Animation::AnchorMode::BottomCentered);
animation_roll_left.add_frame(ResourcesManager::instance()->find_image("player_roll_left"), 7);

Animation& animation_roll_right = animation_roll.right;
animation_roll_right.set_interval(0.05f);
animation_roll_right.set_loop(false);
animation_roll_right.set_anchor_mode(Animation::AnchorMode::BottomCentered);
animation_roll_right.add_frame(ResourcesManager::instance()->find_image("player_roll_right"), 7);


AnimationGroup& animation_run = animation_pool["run"];

Animation& animation_run_left = animation_run.left;
animation_run_left.set_interval(0.075f);
animation_run_left.set_loop(true);
animation_run_left.set_anchor_mode(Animation::AnchorMode::BottomCentered);
animation_run_left.add_frame(ResourcesManager::instance()->find_image("player_run_left"), 10);

Animation& animation_run_right = animation_run.right;
animation_run_right.set_interval(0.075f);
animation_run_right.set_loop(true);
animation_run_right.set_anchor_mode(Animation::AnchorMode::BottomCentered);
animation_run_right.add_frame(ResourcesManager::instance()->find_image("player_run_right"), 10);
紧接着便是武士零角色特有的特效动画对象初始化了
animation_slash_up.set_interval(0.07f);
animation_slash_up.set_loop(false);
animation_slash_up.set_anchor_mode(Animation::AnchorMode::Centered);
animation_slash_up.add_frame(ResourcesManager::instance()->find_image("player_vfx_attack_up"), 5);

animation_slash_down.set_interval(0.07f);
animation_slash_down.set_loop(false);
animation_slash_down.set_anchor_mode(Animation::AnchorMode::Centered);
animation_slash_down.add_frame(ResourcesManager::instance()->find_image("player_vfx_attack_down"), 5);

animation_slash_left.set_interval(0.07f);
animation_slash_left.set_loop(false);
animation_slash_left.set_anchor_mode(Animation::AnchorMode::Centered);
animation_slash_left.add_frame(ResourcesManager::instance()->find_image("player_vfx_attack_left"), 5);

animation_slash_right.set_interval(0.07f);
animation_slash_right.set_loop(false);
animation_slash_right.set_anchor_mode(Animation::AnchorMode::Centered);
animation_slash_right.add_frame(ResourcesManager::instance()->find_image("player_vfx_attack_right"), 5);

animation_jump_vfx.set_interval(0.05f);
animation_jump_vfx.set_loop(false);
animation_jump_vfx.set_anchor_mode(Animation::AnchorMode::BottomCentered);
animation_jump_vfx.add_frame(ResourcesManager::instance()->find_image("player_vfx_jump"), 5);
animation_jump_vfx.set_on_finished([&]() { is_jump_vfx_visible = false; });

animation_land_vfx.set_interval(0.1f);
animation_land_vfx.set_loop(false);
animation_land_vfx.set_anchor_mode(Animation::AnchorMode::BottomCentered);
animation_land_vfx.add_frame(ResourcesManager::instance()->find_image("player_vfx_land"), 2);
animation_land_vfx.set_on_finished([&]() { is_land_vfx_visible = false; });
最后我们需要对状态机进行初始化, 这部分内容需要等待我们完成详细的节点逻辑后再进行编写
{
    // TODO: 状态机初始化
}
2.2 析构函数
对于析构函数,我们保持默认即可。对于碰撞箱对象,我们在基类中创建,自然也要在基类中销毁。
Player::~Player() = default;
2.3 on_input方法
在on_input方法中
void Player::on_input(const ExMessage& msg)
{
    if (hp<=0) return;

    switch(msg.message)
    {
    case WM_KEYDOWN:
        switch (msg.vkcode)
        {
        case 'A':
        case VK_LEFT:
            is_left_key_down = true;
            break;
        case 'D':
        case VK_RIGHT:
            is_right_key_down = true;
            break;
        case 'W':
        case VK_UP:
        case VK_SPACE:
            is_jump_key_down = true;
            break;
        case 'S':
        case VK_DOWN:
            is_roll_key_down = true;
            break;
        }
        break;
    case WM_KEYUP:
        switch (msg.vkcode)
        {
        case 'A':
        case VK_LEFT:
            is_left_key_down = false;
            break;
        case 'D':
        case VK_RIGHT:
            is_right_key_down = false;
            break;
        case 'W':
        case VK_UP:
        case VK_SPACE:
            is_jump_key_down = false;
            break;
        case 'S':
        case VK_DOWN:
            is_roll_key_down = false;
            break;
        }
        break;
    case WM_LBUTTONDOWN:
        is_attack_key_down = true;
        update_attack_dir(msg.x, msg.y);
        break;
    case WM_LBUTTONUP:
        is_attack_key_down = false;
        break;
    case WM_RBUTTONDOWN:
        // TODO: 进入子弹事件
        break;
    case WM_RBUTTONUP:
        // TODO: 退出子弹事件
        break;
    }
}
2.4 on_update方法
在Player的on_update帧更新方法中.
- 我们首先对角色的水平方向移动进行了处理,水平方向速度其实就是标准化的移动方向乘以移动速度大小。
- 那么当速度方向不为0时,我们便需要同时更新is_facing_left的朝向。
- 然后是冷却定时器和特效动画的更新调用
- 当角色处于攻击状态中时,我们便需要设置攻击特效动画的位置始终跟随玩家角色
- 最后,调用基类的on_update方法
void Player::on_update(float delta)
{
    if (hp>0 && !is_rolling) {
        velocity.x = get_move_axis() * SPEED_RUN;
    }

    if (get_move_axis()!=0) {
        is_facing_left = (get_move_axis() < 0);
    }

    timer_roll_cd.on_update(delta);
    timer_attack_cd.on_update(delta);

    animation_jump_vfx.on_update(delta);
    animation_land_vfx.on_update(delta);

    if(is_attacking)
    {
        current_slash_animation->set_position(get_logic_center());
        current_slash_animation->on_update(delta);
    }

    Character::on_update(delta);
}
2.5 on_render方法
在on_render渲染方法中,我们根据渲染顺序,依次执行起跳落地特效、玩家角色动画和攻击特效动画的渲染。
void Player::on_render()
{
    if(is_jump_vfx_visible) {
        animation_jump_vfx.on_render();
    }
    if(is_land_vfx_visible) {
        animation_land_vfx.on_render();
    }

    Character::on_render();

    if(is_attacking) {
        current_slash_animation->on_render();
    }
}
2.6 特殊方法
在on_hurt中我们只需要通过先前已经封装好的音频播放函数,播放对应的音效就可以了。
void Player::on_hurt()
{
    play_audio(_T("player _hurt"), false);
}
起跳和落地的逻辑十分简单。我们只需要设置特效的可见性和位置,并重置特效动画让它从头开始播放就好了。
唯一不同的时,在起跳时我们还需要给角色一个竖直像上的速度。
void Player::on_jump()
{
    velocity.y = -SPEED_JUMP;
    is_jump_vfx_visible = true;
    animation_jump_vfx.set_position(position);
    animation_jump_vfx.reset();
}

void Player::on_land()
{
    is_land_vfx_visible = true;
    animation_land_vfx.set_position(position);
    animation_land_vfx.reset();
}
在翻滚方法中,除去重置冷却事件定时器和翻滚动画状态的代码外,我们还需要根据角色当前的朝向,设置其水平方向的移动速度,
void Player::on_roll()
{
    timer_roll_cd.restart();
    is_roll_cd_comp = false;
    velocity.x = is_facing_left ? -SPEED_ROLL : SPEED_ROLL;
}
在on_attack攻击逻辑中,我们首先重置计时器,之后更具不同的攻击朝向枚举,选择不同的特效动画,最后不要忘记设置攻击动画的初始位置在角色的逻辑中心处。
void Player::on_attack()
{
    timer_attack_cd.restart();
    is_attack_cd_comp = false;
    switch (attack_dir)
    {
    case Player::AttackDir::Up:
        current_slash_animation = &animation_slash_up;
        break;
    case Player::AttackDir::Down:
        current_slash_animation = &animation_slash_down;
        break;
    case Player::AttackDir::Left:
        current_slash_animation = &animation_slash_left;
        break;
    case Player::AttackDir::Right:
        current_slash_animation = &animation_slash_right;
        break;
    }
    current_slash_animation->set_position(get_logic_center());
    current_slash_animation->reset();
}
最后便是计算角色攻击方向的方法了,
首先使用反三角函数计算得到鼠标点击位置和角色位置夹角的弧度
void Player::update_attack_dir(int x, int y)
{
    static const float PI = 3.1415926534f;
    float angle = std::atan2(y - position.y, x - position.x);

    if (angle >= -PI / 4 && angle < PI / 4) {
        attack_dir = AttackDir::Right;
    } else if (angle >= PI / 4 && angle < 3 * PI / 4) {
        attack_dir = AttackDir::Down;
    } else if ((angle >= 3 * PI / 4 && angle <= PI) || (angle >= -PI && angle < -3 * PI / 4)) {
        attack_dir = AttackDir::Left;
    } else {
        attack_dir = AttackDir::Up;
    }
}
评论
如果你已登录 GitHub,就可以直接在这里评论。